New RLN6500 MOTOTRBO Bluetooth Kit Replaces HK200

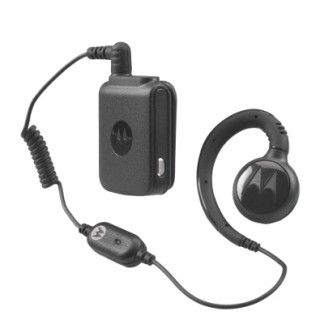
MOTOTRBO RLN6500 Bluetooth Accessory KitMotorola Solutions recently cancelled pending HK200 Bluetooth headset orders after running out of stock. The recommended replacement is the new RLN6500 MOTOTRBO Bluetooth Accessory Kit. The RLN6500 has a comfortable swivel earpiece connected to a pod with clothing clip.

The new design provides a more professional appearance and prevents others from thinking your employees are on their cell phones. Additional earpiece styles will be added in the future.
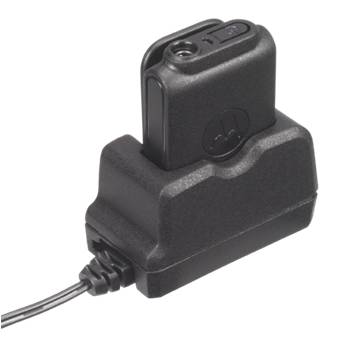
RLN6500 ChargerThe RLN6500 provides enough battery life for a full 8-10 hour shift unlike most cellular style Bluetooth headsets.

Included is a compact 120V AC charger with cradle for quick and easy charging for the next shift.

Designed for MOTOTRBO DMR Bluetooth Enabled Radios

The RLN6500 is designed to be used with MOTOTRBO Bluetooth enabled radios including the SL 7550, XPR 5350, 5550, XPR 7350, 7550. It is also compatible with XPR 6100, 6300, and 6500 series radios using the PMLN5712 adapter.PMLN6397 Replacement Swivel Earpiece and In-line Mic
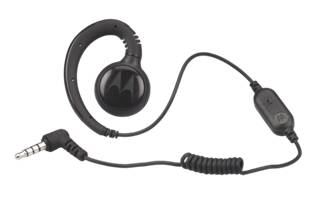
It is easy to share among employees with extra PMLN6397 earpieces with in-line mic (pack of 3). The earpiece has a antimicrobial coating for healthcare applications.

Once paired, the headset will reconnect with the radio the next time it is turned on. It is not compatible with the PMLN5993 Bluetooth adapter with touch pairing so you will need to keep it paired with the same radio. The RLN6500 is not compatible with cell phones so you are less likely to lose them due to theft.

Lower Cost Alternative for MOTOTRBO Bluetooth Audio Accessories

The RLN6500 is priced lower than the Operations Critical NNTN8295 wireless earbud with pod and the NNTN8125, NNTN8126 earpieces.
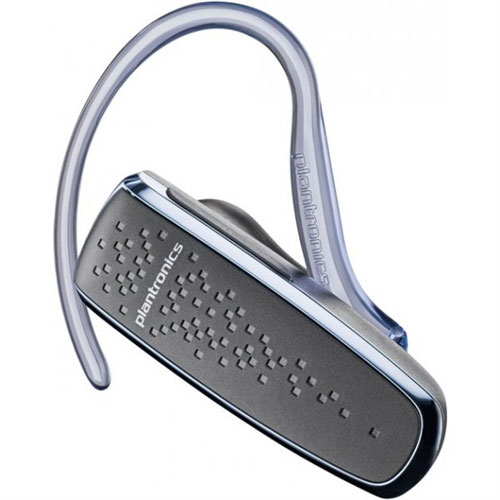
Plantronics-85550-01 M50For those who need a HK200 replacement with long battery life that will also pair with a cell phone, we recommend the Plantronics M50 85550-01.

It has standard Bluetooth 3.0, provides 9-11 hours of typical use, and uses a micro-USB charger connector.

For more Motorola Bluetooth accessories download the Operations Critical MOTOTRBO Wireless Accessory Catalog.

Tips To Minimize Driver Resistance When Deploying GPS Fleet Tracking

Magnum AVL Logo Truck and MapAs fuel prices rise, more business owners and managers with smaller fleets are looking at GPS tracking. It is difficult to compete in today’s economy without the productivity gains of GPS fleet management.

Some small business owners are concerned that installing GPS fleet tracking will cause a morale problem with their employees and possibly affect their “family” corporate culture. The tips below have been used by Magnum AVL commercial and government fleet owners who have successfully installed GPS fleet and asset tracking.

Focus on Driver Benefits and Recognize Good Behavior

  • Your good employees won’t mind being tracked. They carry the load when weaker or new employees pull down the team.
  • GPS tracking provides “command & control” so work is spread evenly
  • If you use cell phones to communicate, GPS eliminates the “where are you” calls while driving.
  • You will know when they are delayed due to traffic conditions. Dispatchers can also help drivers get back on track should they become lost.
  • Proof your drivers were at the correct locations for “No Shows”.
  • Backup for invoice disputes or complaints involving your vehicles.
  • Recognize the drivers with the least amount of monthly idling time who save fuel.
  • GPS reports can eliminate driver logs and provide time card info.

Install GPS in ALL Vehicles in ALL Departments To Avoid Favoritism

Installing GPS tracking in some vehicles (but not all) can be viewed as favoritism and can be perceived negatively by the drivers who are tracked. If you can’t afford to do the entire fleet, look at a leasing or renting the equipment.

Start Saving Fuel With Magnum AVL GPS Fleet ManagementMagnum AVL Logo

Magnum AVL uses state-of-the art equipment with a 3 year warranty, a Google mapping interface, and no long term contract. We have customers from Delaware to California. Contact us using the form below to discuss your requirements or call us at 302-734-9250.

← Back

Thank you for your response. ✨

Over-the-Air Programming Steps for Motorola DTR Digital Radios

Written by Jeremy Byler, CETsr

How to Remotely Add or Update a DTR Radio Contact to your Fleet

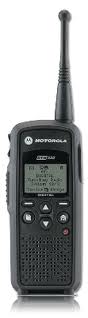
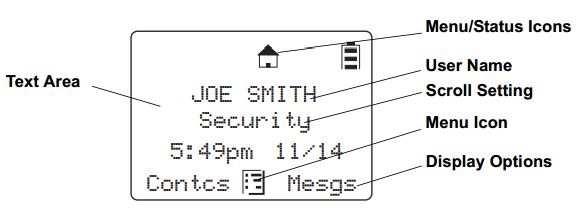
Motorola DTR650 License Free RadioMotorola DTR650 digital radios can be programmed with a unique ID so other users can identify the person transmitting. Most of our customers request that we program their radios with employee names or job functions. This is helpful during emergencies, call alerts, and one-to-one communications.Info Displayed on DTR

When an additional radio is purchased, replaced, or updated the digital ID must be programmed in all of the existing radios. This is easily accomplished using the DTR650’s over-the-air programming feature.

All DTR Radios Must Be Turned “ON” and In Range

After the new radio is programmed using Motorola’s DTR CPS software and programming cable, begin by inserting the battery and connecting the antenna. All radios must be powered ON and within range of the new DTR for programming to be successful.

Use Cloning Mode to Add Contacts Wirelessly

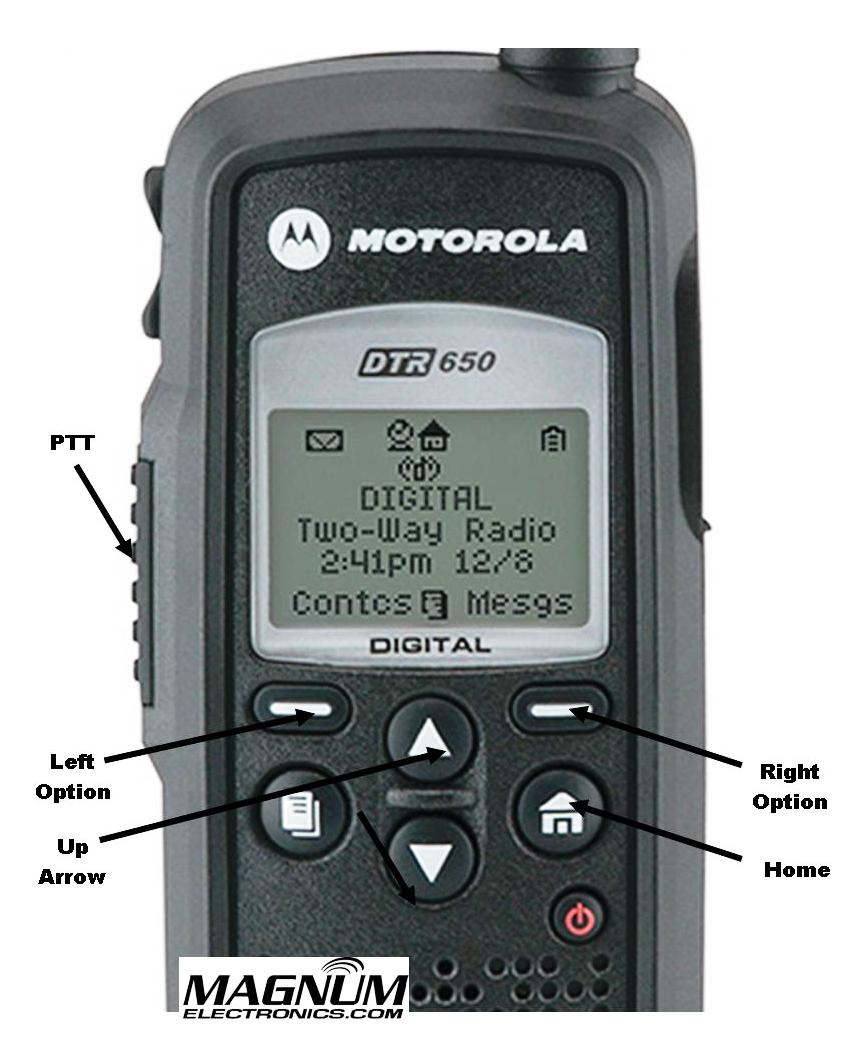
To place the new radio in cloning mode a series of button presses is required. Refer to the picture for button locations and follow the steps below:DTR Radio Button Labels

  • Hold down the “Home” button and press the PTT (push-to-talk) button three times
  • Press the “Left Option” button
  • Press the “Up Arrow” button
  • Press the “Right Option” button
  • Hold down the “Home” button and press the PTT button three times
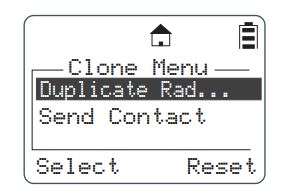
  • When done correctly screen will display cloning mode

DTR Radio Cloning Menu Mode

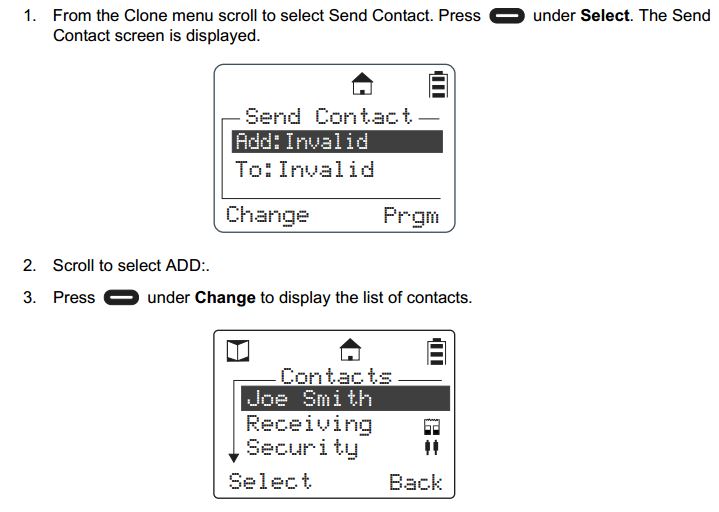
From Cloning Menu Choose “Send Contact”

When the DTR is in cloning mode, scroll to the “Send Contact” and choose the contact you want to send to the other radios per steps 1-3 below.Steps 1-3 Adding DTR Contacts Remotely

 Select the Contact You Want to Send to the Other DTR Radios

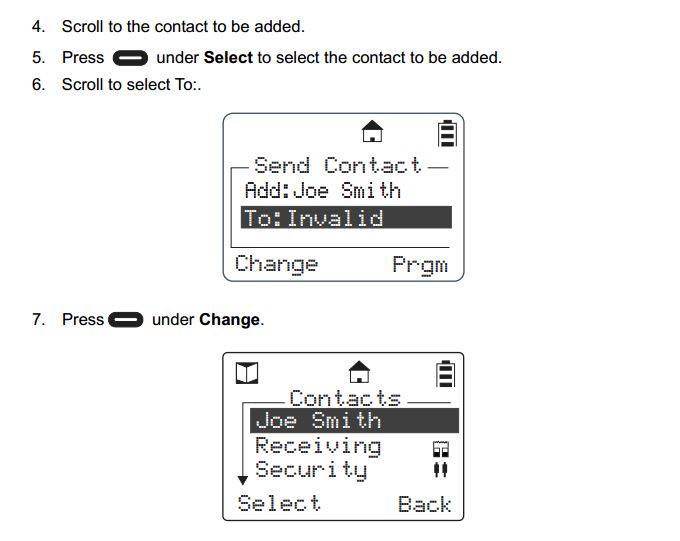
Steps 4-7 shows how to scroll through the list of radio contacts and change to the one you want to send to the other radios in your fleet.

Steps 4-7 Add DTR Contacts Remotely

Press “Program” and “Go” to Finish the Cloning Operation

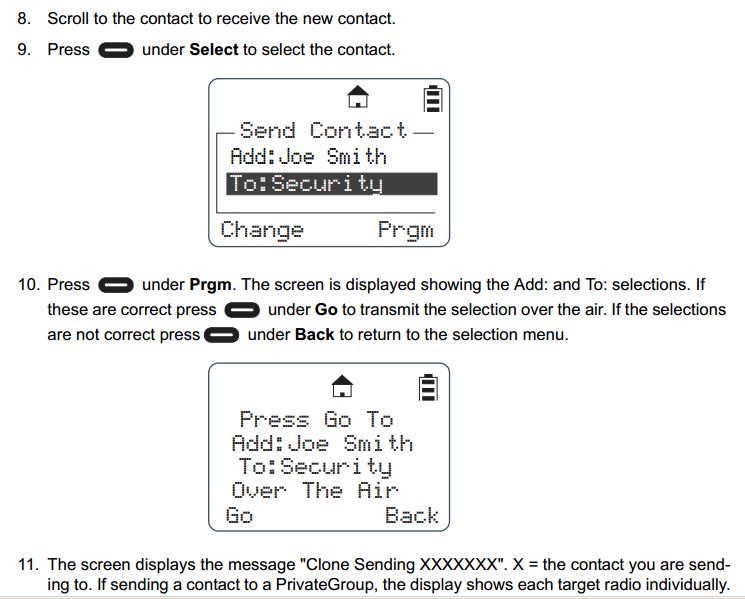
Steps 8-11 include selecting the target radio or radio group and sending the info wirelessly using the “Program” and “Go” soft buttons.

Steps 8-11 Add DTR Contacts Remotely

After operation is completed, a status message will appear. It will either display “Successful” or show a list of radios that failed. A radio will fail if it is powered off or is out of range.

If only a single radio needs to be updated, choose the name of the radio that needs to be updated instead of the group. Once this operation is successfully completed and all your radios have been updated with the new radio’s contact information, your DTR system will communicate properly.

For more information download the Motorola DTR Series User Guide and the Generation 3 DTR650 Product Training presentation from Motorola Solutions.

GPS Fleet Management From Your Smartphone

Magnum AVL Live GPS Tracking for Android and Apple Mobile DevicesMagnum AVL Logo

Fleet location, speed, and history for up to 6 months has been optimized for Magnum AVL users with smartphones and tablets. Our new Mobile Viewer portal provides fast access from your Home screen. Set-up is simple and only takes a couple minutes using your same login info. 

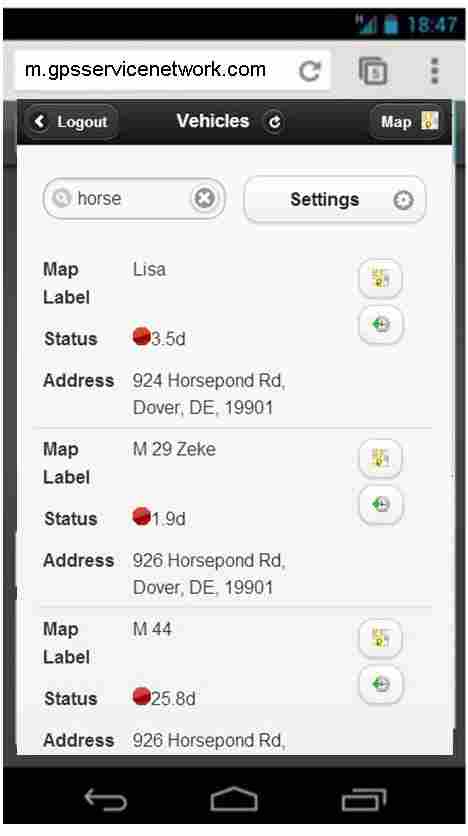
List View Can Be Customized to Show Preferred InfoMagnum AVL Mobile Viewer List View

After the single press log-in, the List View control screen shows all of your vehicle, asset, and trailer trackers. You have the ability to show (or hide) and sort the following info:

  • Map label
  • Serial number of AVL tracker
  • Status (length of stop or moving)
  • Group (for larger fleets)
  • Odometer
  • Street Address
  • Driver
  • Vehicle VIN number

Most users will want to change the default settings to hide the serial numbers and unhide the address fields.

Map, Street, Satellite, and History View Screens Provide Fast Answers

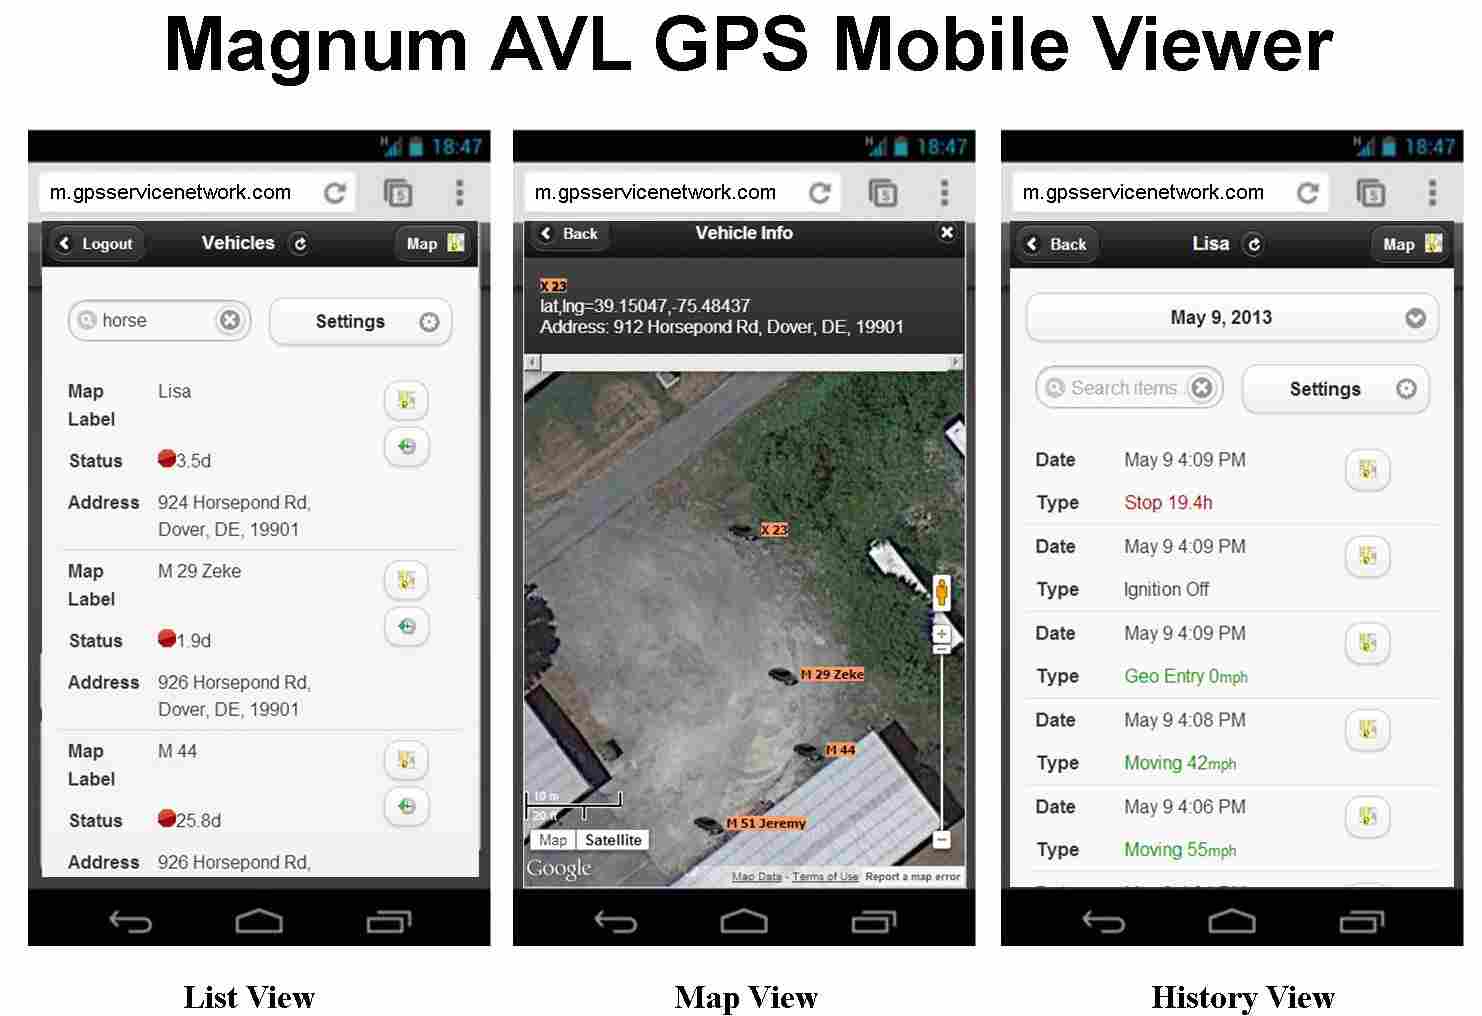
Mobile Viewer List, Map, History Screen Shots

The same icons found in the desktop version make it easy to use the Magnum AVL Mobile Viewer. From the List View screen a simple button press will launch the Map View or the History View that shows speed and location data for the previous 6 months.

Magnum AVL GPS service pricing plans do not require a long term contract. If you have any questions or need to contact us, please use the form below:

← Back

Thank you for your response. ✨

Motorola IMPRES Battery Tips and Charger Indicator Lights

Proper IMPRES Battery Care Starts With Initialization

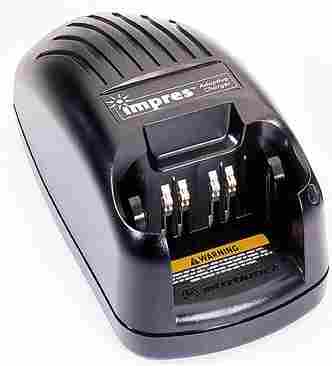
Motorola IMPRES ChargerA Motorola IMPRES battery must be initialized by an IMPRES charger the first time it is charged. This process is indicated by a STEADY YELLOW light on the charger indicator (the same as if the battery were reconditioning). The process is automatic, includes an initial reconditioning of the battery, and begins charging upon completion of this process.

This process requires approximately 12 hours depending on the capacity. Do not remove the battery from the charger until the STEADY GREEN light is on.

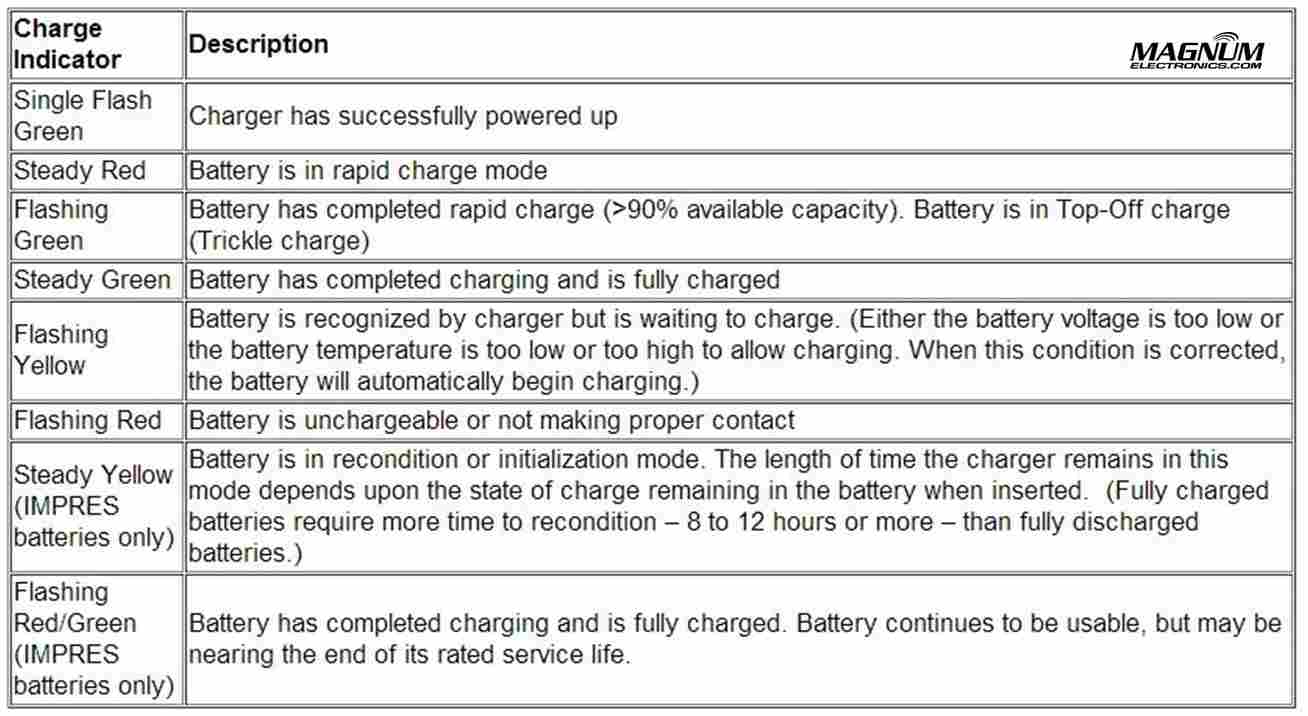
IMPRES Indicator Light Chart with Explanations

Motorola IMPRES Charger Light Indicators

IMPRES Automatic Battery Conditioning

Motorola IMPRES Adaptive Chargers, when used in conjunction with a Motorola IMPRES battery, have the ability to determine the appropriate time to recondition the battery. When an IMPRES battery is properly inserted into the charger, the charger determines if it is appropriate to recondition the battery. If the battery needs reconditioning, the charger automatically indicates a STEADY YELLOW.

This process may take up to 12 hours to complete, depending upon the state of charge and capacity rating of the battery when it is inserted. It is important to note, for this process to be effective, the IMPRES battery must be allowed to complete the recondition/recharge process. Leave the battery in the charger until the charger indicates a STEADY GREEN. At the completion of the recondition cycle, the charger automatically recharges the IMPRES battery.

How to Terminate the IMPRES Conditioning Process

At any time during the reconditioning process of a Motorola IMPRES battery (STEADY YELLOW indication), reconditioning may be terminated by removing and reinserting the battery back into the charger within 5 seconds. This causes the charger to terminate the reconditioning process and begin the charging process. The charger indicator changes to a STEADY RED. The charger will attempt to recondition the battery at the next battery insertion.

Manually Initiating the IMPRES Reconditioning Process

Within 2-1/2 minutes of the initial insertion of an IMPRES battery (STEADY RED indication), remove and reinsert the battery within 5 seconds to manually force reconditioning to occur. The charger indicator changes from a STEADY RED to a STEADY YELLOW. This forces the charger to recondition and automatically recharge the battery. This is a useful feature to have when IMPRES batteries have been in storage for several months or longer. Two or three manual recondition cycles may be required to rejuvenate the batteries, due to long term storage conditions.

Complete List of Motorola KVL Encryption Keyload Cables and Adapters

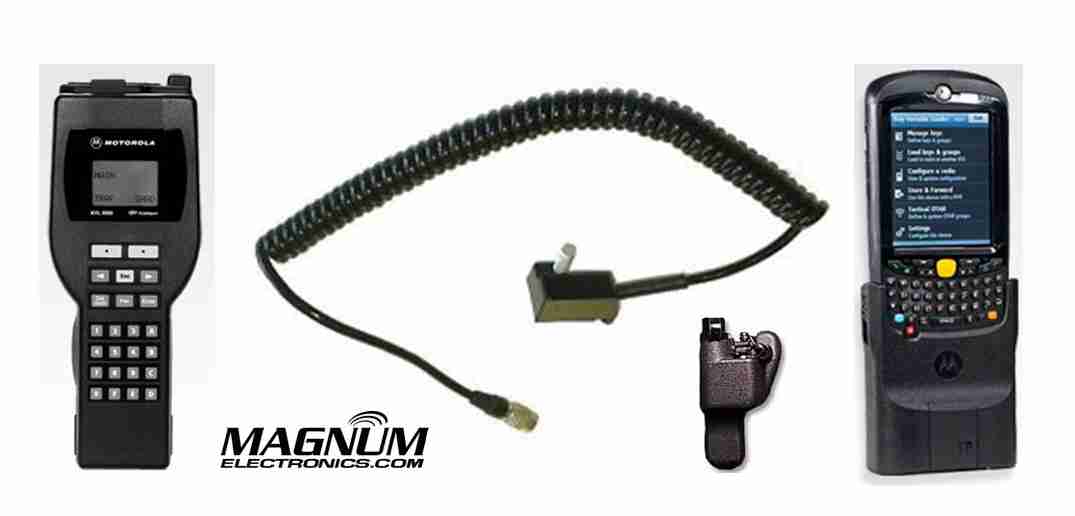
Motorola KVL 3000 and 4000 Cables

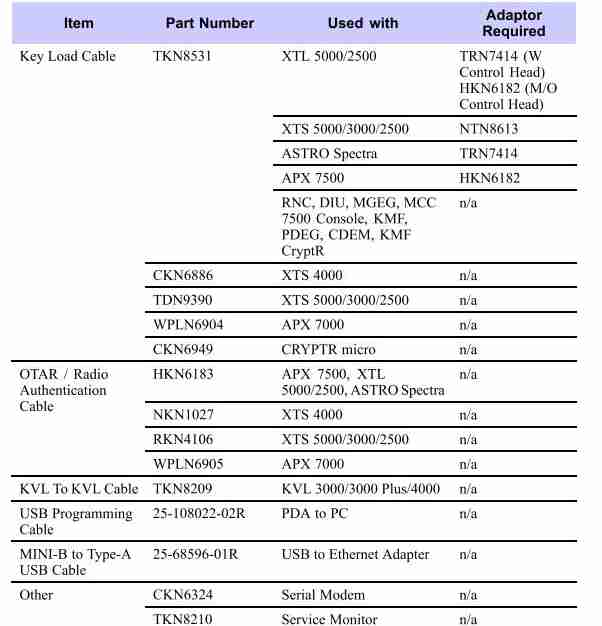
KVL 3000/4000 Keyload Interface Cables and Adapters

Most Motorola military and law enforcement 2-way radio communications uses an encrypted algorithm for secure voice messages. The encryption key is inserted in the radio using a KVL 3000 or KVL 4000 as shown. The basic interface cable is the Motorola TKN8531 and an adapter specific to the radio model. XTS 5000/2500 series portable hand-held radios require a NTN8613 adapter. APX 7500/6500  and most XTL 5000/2500 mobile radios need the HKN6182.

APX 7000/6000 series use the WPLN6904 cable that does not require an adapter.

OTAR and Radio Authentication Cables 

For systems using OTAR (over-the-air-rekeying) or radio authentication, the KVL uses a different set of cables without the need for adapters. APX, XTL, and Astro Spectra mobile radios use the HKN6183. XTS portable radios require the RKN4106 and APX 7000/6000 portables use the WPLN6905 cable.

For a complete list of KVL 4000 cables, adapters, and accessories, see the charts below.

Motorola KVL Interface Cables and Adapters

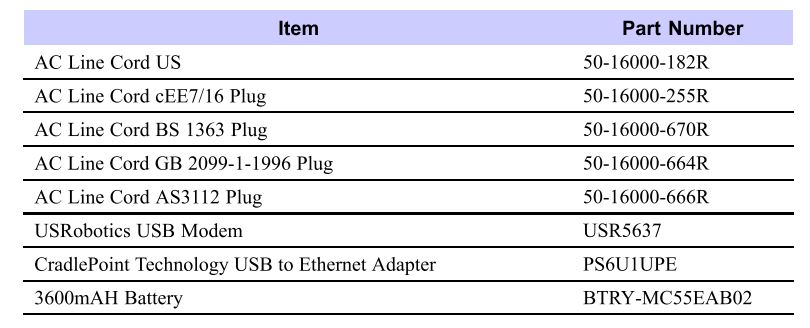
Optional accessories for the KVL 4000:

KVL Optional Accessories

How to Choose the Correct Motorola Bluetooth Accessory for your Radio

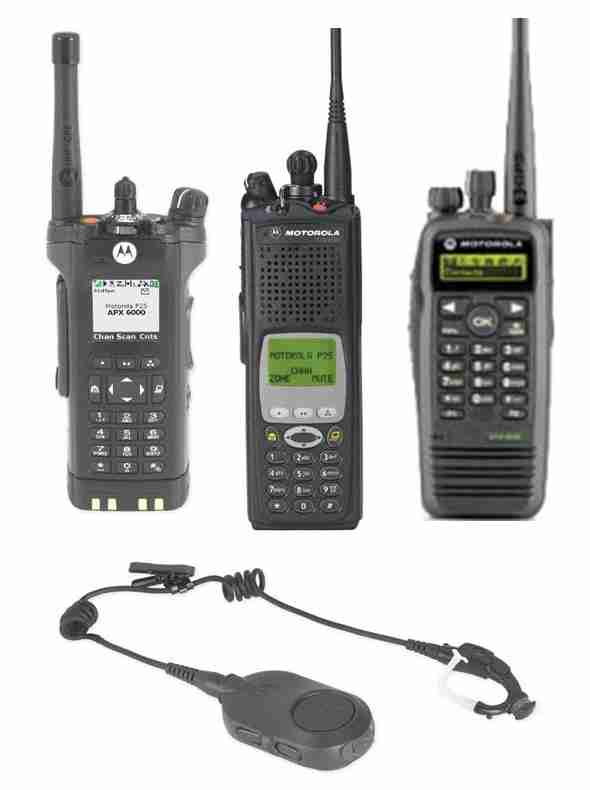
Radios_BluetoothBluetooth accessories are starting to get complicated for Motorola public-safety and professional radio models. There are now three different types of wireless audio accessories: 

  • Mission Critical with encryption and touch pairing
  • Operations Critical Enhanced with touch pairing
  • Operations Critical Standard Bluetooth

Mission Critical Wireless With 128-bit Encryption is Most Secure

For the most secure wireless communications that is extremely difficult to hack, choose the mission critical models. These are only available for APX series with the internal Bluetooth option or the XTS series with the external PMLN5792 Mission Critical wireless adapter. Motorola’s proprietary “out of band” pairing with 128-bit encryption provides the best secure connection and only takes a few seconds. Pairing takes place when the radio and the audio accessory are within an inch of each other. It does not matter which radio you use – pairing is easy and quick.

Mission Critical Wireless Accessories for APX and XTS

If you have an APX 7000, APX6000, or APX 4000, the internal Bluetooth option must be enabled. At this time, Mission Critical Wireless is only available for APX radios although it is rumored standard Bluetooth might be available in the future. It is possible to use an external third party or MOTOTRBO adapter but it would not support the encrypted accessories.

Mission Critical Wireless AdapterThe PMLN5792 external adapter is compatible with the XTS 5000, XTS 2500, XTS 1500, MT1500, and PR1500. Cancelled models including XTS3000, HT1000, MTS2000, etc. will probably work but are not supported.

Following are the mission critical accessories for APX and XTS models:

  • NTN2570 Earpiece with 12 inch cable includes NTN2571 PTT pod
  • NTN2573 Earpiece with 9.5 inch cable includes NTN2571 PTT pod

Wireless Covert KitOptional wireless earbuds (NNTN8294 11.4 inch cable) or (NNTN8295 45.7 inch cable) are available that attach to the NTN2571 PTT pod. For covert surveillance operations, the  NNTN8295 uses ipod type earbuds or any 3.5mm audio accessory.

Enhanced Operations Critical with Touch Pairing

Enhanced Operations Critical provides intrinsically-safe operation with grab-and-go touch pairing. It is only available with the MOTOTRBO XPR 6300, XPR 6350, XPR 6380, XPR 6500, XPR 6550, and XPR 6580 radios. The PMLN5993 external adapter uses the NTN2570 earpiece.

We tried the PMLN5993 adapter with both the APX 4000 and XPR 7550 after getting conflicting answers from Motorola tech support. We tried multiple times with different accessories without success.

Operations Critical Standard Wireless Bluetooth

Standard Bluetooth adapters are available for all XTS, and XPR MOTOTRBO radio models. The RMN5104 allows the XTS 5000, XTS 2500, XTS 1500, MT1500, and PR1500 to use any standard Bluetooth headset. The PMLN5712 adapter is designed for the XPR6100/6300/6500 series. The XPR5350/5550 mobile radio, XPR7350/7550 portable, and the SL7550 have internal Bluetooth included.

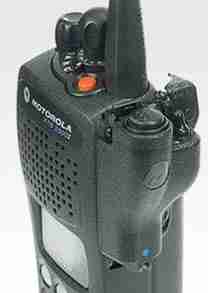
Operations Critical Pod

Following are the certified Operations Critical accessories:

Optional wireless earbuds (NNTN8294 11.4 inch cable) or (NNTN8295 45.7 inch cable) are available that attach to the NNTN8127 PTT pod.

Magnum AVL GPS Reports Provide Powerful Fleet Data

AVL Reports Menu OptionsMagnum AVL GPS fleet and asset tracking provides reports with data that will help manage your fleet and reduce costsYour fleet data is available for up to six months with the option of downloading or emailing the reports in multiple formats. 

A couple clicks and drop down menus will let you select the report type, vehicle, time frame, stops, idle, speed, etc. Once the report is created it can be saved for future use and/or sent via email automatically.

Select the Best Magnum AVL GPS Fleet Management Report

The purpose of this article is provide a list of the most commonly used reports with a short description so you can become familiar with them. All of the reports are included with any of the Magnum AVL service plans.

Daily Details

Shows the stop time, move time, distance, # of stops, # of geofences, # of Input Alerts, # of Speed Alerts of each vehicle by day.

Magnum AVL GPS Daily Details Report

Summary

Shows the stop time, move time, distance, # of stops, # of geofences, # of Input Alerts, # of Speed Alerts of each vehicle for entire report period.

After Hours

Shows all of the movements for each vehicle between the start and end dates and between the hours specified in the report period.

All Geofences

Shows all of the Geofence Alerts that occurred for each vehicle between the start and end date and within the hours specified in report period.

All Input Alerts

Shows all of the Input Alerts that occurred for each vehicle between the start and end date and within the hours specified in report period.

All Speed Alerts

Shows all of the Speed Alerts that occurred for each vehicle between the start and end date and within the hours specified in report period.

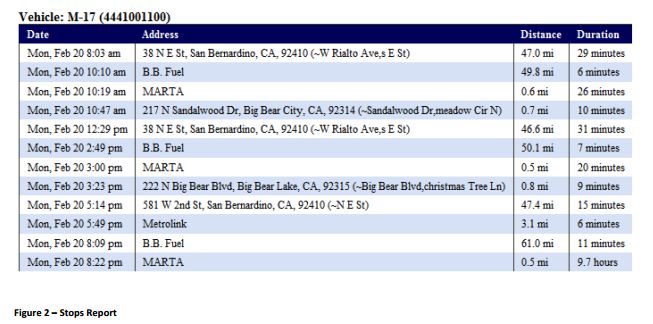
All Stops

Shows all of the stops that occurred for each vehicle between the start and end date and within the hours specified in report period.

Magnum AVL GPS All Stops Report

Landmark

Shows all of the current landmarks for this account with the times each vehicle entered and exited the landmark ordered by date.

Landmarks by Vehicle

Shows when each vehicle entered and exited landmarks.

First/Last Trip By Day

Shows the start and stop times of the first and last trips of each of the days in the start/end date range.

All Trips By Day

Shows the start and stop times of all the trips of each of the days in the start/end date range.

First/Last Location By Day

Shows the first movement and last movement of each vehicle on each day.

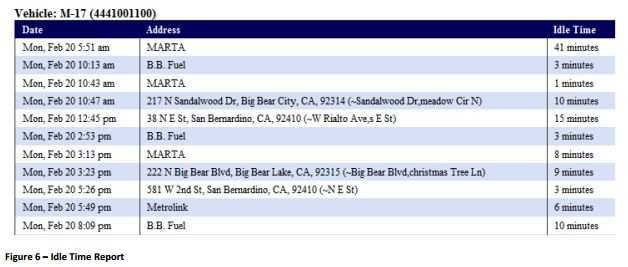
Idle Time

Shows the amount of time a vehicle has been idling (ignition on without movement).

Magnum AVL Idle Time Report

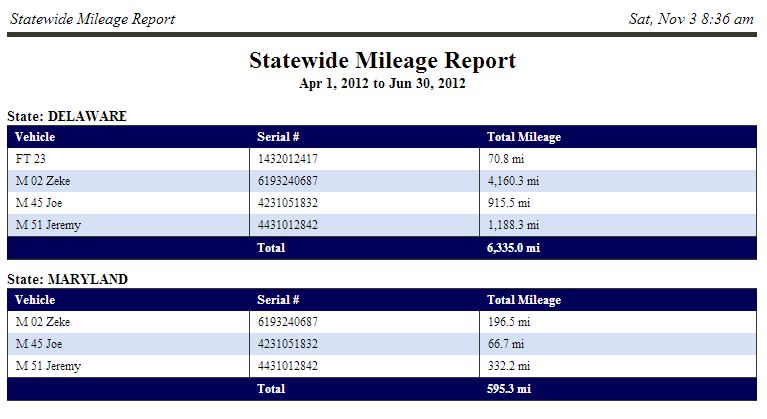
State Mileage

Distance each vehicle travels in each state over the selected period of time.. Magnum AVL State Mileage for IFTA

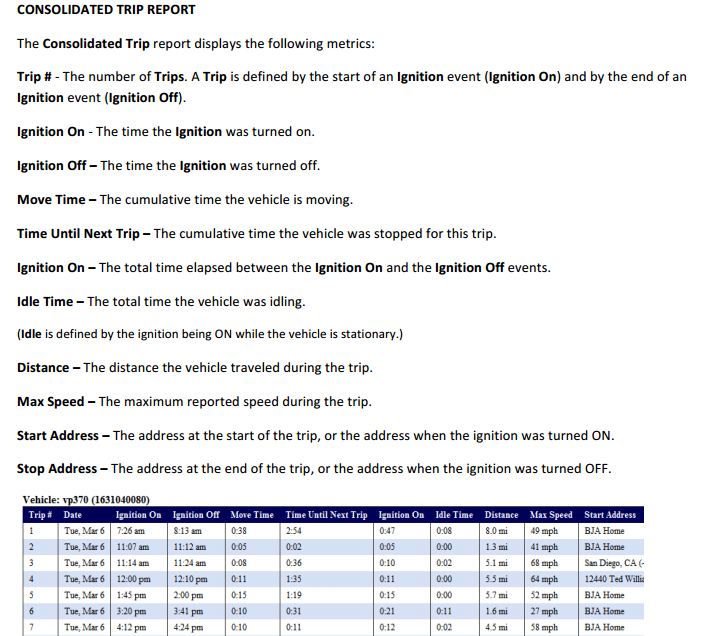
Consolidated Trip Report

This is a summary of all trips and includes trip distance, trip time, idle time, and trip start and stop. In order for this report to work, the ignition wire must be connected.

AVL GPS Consolidated Trip Report

Location History

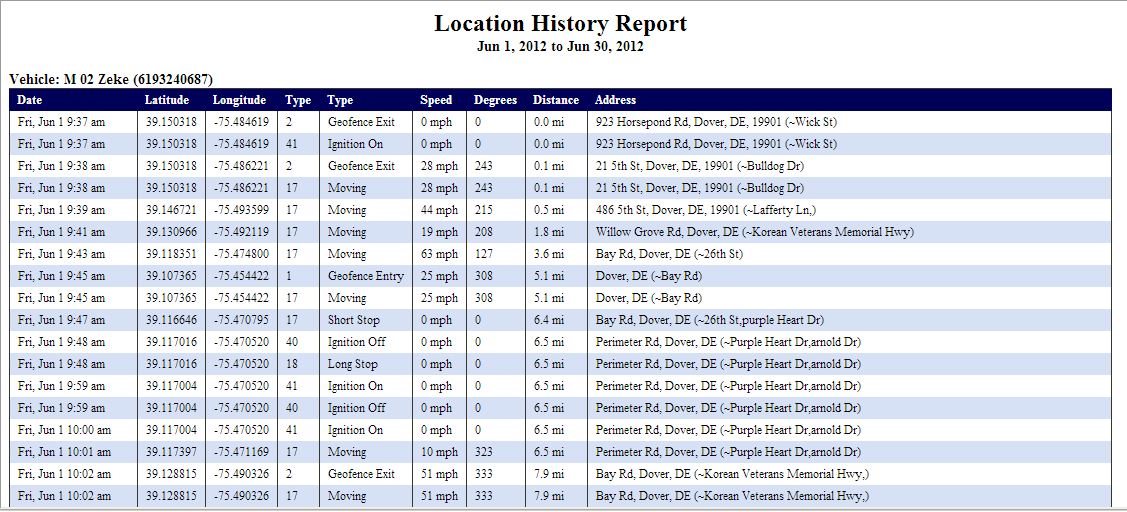
Will display vehicle movement events, ignition events, geofence events, stop events, over speed events, etc.  Included in the report are time and date stamps for each event, as well as address, latitude/longitude, distance, and heading. Use this for backup detail with the State Mileage Report for IFTA audits. You must check the box “show addresses” to provide the required detail.

Magnum AVL Location History Report

Workday Summary

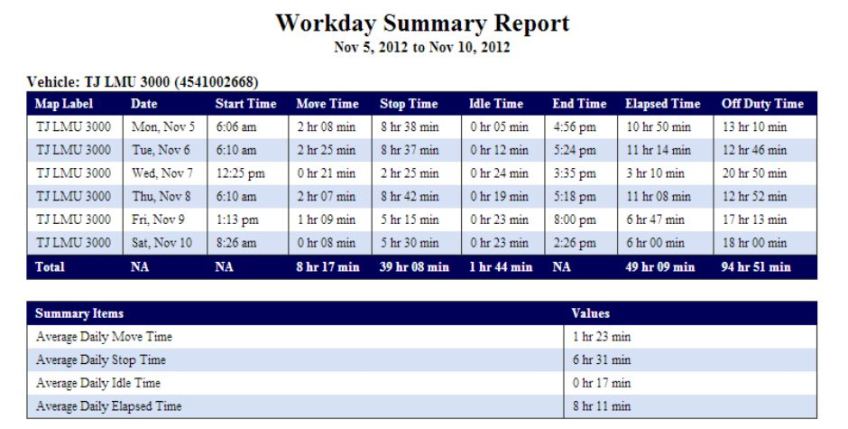
A comprehensive report that summarizes start time, move time, stop time, idle time, end time, and total elapsed time during the reporting period.

Workday Summary Report

Workday Daily Details

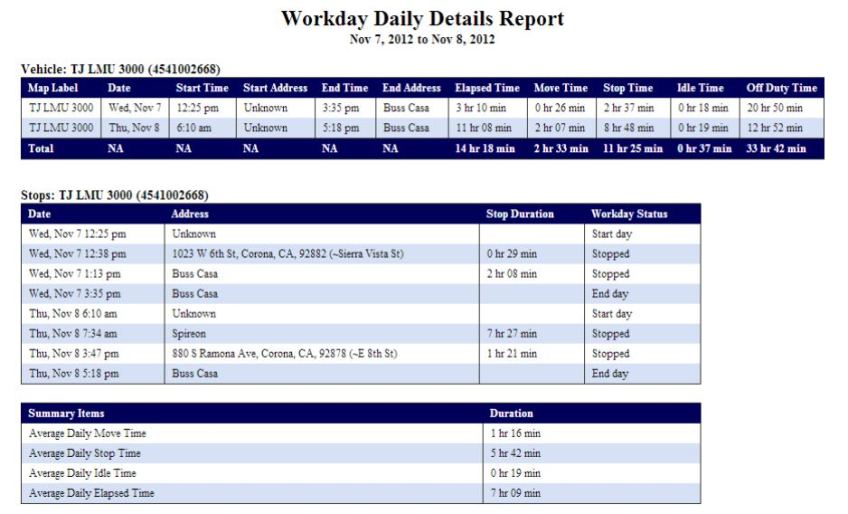
In addition to the data included in the Workday Summary, this report includes start and end addresses and off duty time during the reporting period.

Workday Daily Details Report

How Magnum AVL GPS Local Fleet Management Impacts Your Bottom Line

Real Time Vehicle Location Data Improves Decision Making

Magnum AVL - Improving Fleet Efficiency with GPSIn today’s fast paced business environment, knowing where your vehicles are provides a competitive edge. If knowledge is power and time is money, even small local fleets can benefit from Magnum AVL fleet and asset tracking.

Knowing exactly where all of your mobile assets are in real time or being able to look back anytime during the past 6 months with a couple mouse clicks will make you a smarter organization. You will be able to quickly identify where you are losing money and make corrections faster.

Most Local Fleets Save a Minimum of 20%-25% on Fuel Bills

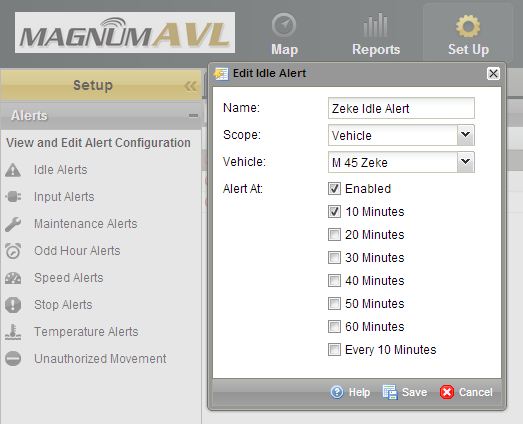
Magnum AVL Idle Alert SetupMagnum AVL provides vehicle idle time reports each day, week, month, etc. You can be alerted with an email or text message in real time after a predetermined limit has been exceeded if you desire. The average vehicle burns almost a gallon of fuel every hour so just decreasing idle time can justify the return on investment.

Speeding in a lettered vehicle not only uses more fuel but it can ruin your reputation. You can also set speed alerts with Magnum AVL to identify a reckless driver.

GPS Tracking Prevents Unauthorized Use Resulting in Fewer Miles

Fewer miles driven means going to the pump less often. How many miles per gallon do your vehicles average? If your service truck gets 17 mpg, 10 less miles per day will double your ROI. If your mobile assets are remote and don’t start/end the day at your yard this can save significantly more.

Labor and Overtime Costs Will Drop With GPS Fleet Tracking

Magnum AVL can reduce labor and overtime costs especially when there is more than one worker in the vehicle. You will know exactly when your vehicle arrives and leaves the job. Customer complaints about a driver that never showed or was there only a short time can be checked and proven true or false immediately.

If you seem to have a chronic overtime problem, Magnum AVL will provide the information needed to identify the cause. Saving 30 minutes of overtime per week can save thousands of dollars at the end of the year.

Magnum AVL Improves Employee Safety, Customer Service, and Peace of MindMagnum AVL Logo Truck and Map

Contact your drivers when they are stopped and not when they should be concentrating on the road. Let your customers know when your technicians are about to arrive at a service call. Know job arrival times without bothering the driver.

Also, many insurance companies will provide a discount when GPS fleet tracking is installed.

Interested in a Demo,  ROI Analysis, or Have a Question?

← Back

Thank you for your response. ✨

Motorola Temple Transducers Provide Discreet Listening

2-Way Radio Headset Keeps Ears Uncovered

Motorola 2-way Radio Temple TransducerTemple transducers are available for most Motorola 2-way radios and are the only audio accessory that keeps your communications discreet without covering your ears. Loud and clear radio transmissions are received using transducers that rest on each temple. The ears are uncovered so you will hear normally when there is no radio traffic. People close by will not hear radio messages keeping your communications private.

Use Temple Transducers in High Noise Environments with Earplugs

Temple transducers can be more comfortable than muff style headsets in hot weather orSpring & Associates Driller when working on loud machinery. Maryland based Spring and Associates performed a comparison on their job site with extreme machinery noise using MOTOTRBO XPR6550  radios. The PMLN5101 temple transducer was preferred except when extreme noise levels approached 130dB.

Choose the Correct Temple Transducer for Your Radio

Motorola offers temple transducers with connectors for most of their radios. The new APX series radios have a direct wire connector and a new boomless model that is compatible with the APX display microphone.

APX 7000, 7000XE, APX 6000, 6000XE, APX 4000 Radio Models

RMN5116 Temple TransducerFor the new APX P25 series, choose the PMLN5101 temple transducer with boom microphone.

The boomless RMN5116 is the correct choice if you use a APX display remote speaker microphone.

XTS 5000, XTS 2500, XTS 1500, PR1500, MT1500 Radio Models

Rugged Temple Transducer

RMN5049

The standard temple transducer with the XTS series connector is the RMN4049. There is also a more rugged version, RMN5049, that includes an adjustable headband keeping it more secure when repelling, jumping, or performing other physical activity. These are also compatible with HT1000, JT1000, MTS2000, MT2000, MTX8000, MTX9000, XTS3000, and XTS3500.

MOTOTRBO XPR 6100, 6350, 6550, 7350, 7550 Radio ModelsMotorola PMLN5101

All Motorola XPR 6000 and 7000 series radios are compatible with the PMLN5101 temple transducer. An oversized PTT and coiled cord is included.

There is no temple transducer available yet for the XPR3300, XPR3500, or SL7550.

Motorola HT750, HT1250, HT1550, PR860 Radio Models

The RMN4048 is the correct temple transducer model if you have a Motorola HT750/1250/1550, PR860, MTX850, MTX8250, MTX950, or MTX9250.

There is a rugged version, RMN5048 with an adjustable headband too. Both have a large PTT body switch.

Motorola EX500, EX560, EX600 Radio Models

The Motorola EX radio compatible temple transducer is the PMLN4585.

Motorola BPR40, CP110, CP185, CP150, CP200, PR400

CP200 Temple TransducerChoose the PMLN5003 boomless lightweight temple transducer with in-line microphone and 2 prong connector. Adjustable for use on long shifts. Not suitable for high noise environments.

Also compatible with P1225, CP125, VL130, CT150, CT250, CT450, GP300.

Motorola DTR410, DTR650, VL50

The RMN5114 is the correct choice. Although it uses a similar sized 2 prong connector like the PMLN5003, they will not fit the jack.