Configure Your APX With The Best Controls For Your Installation
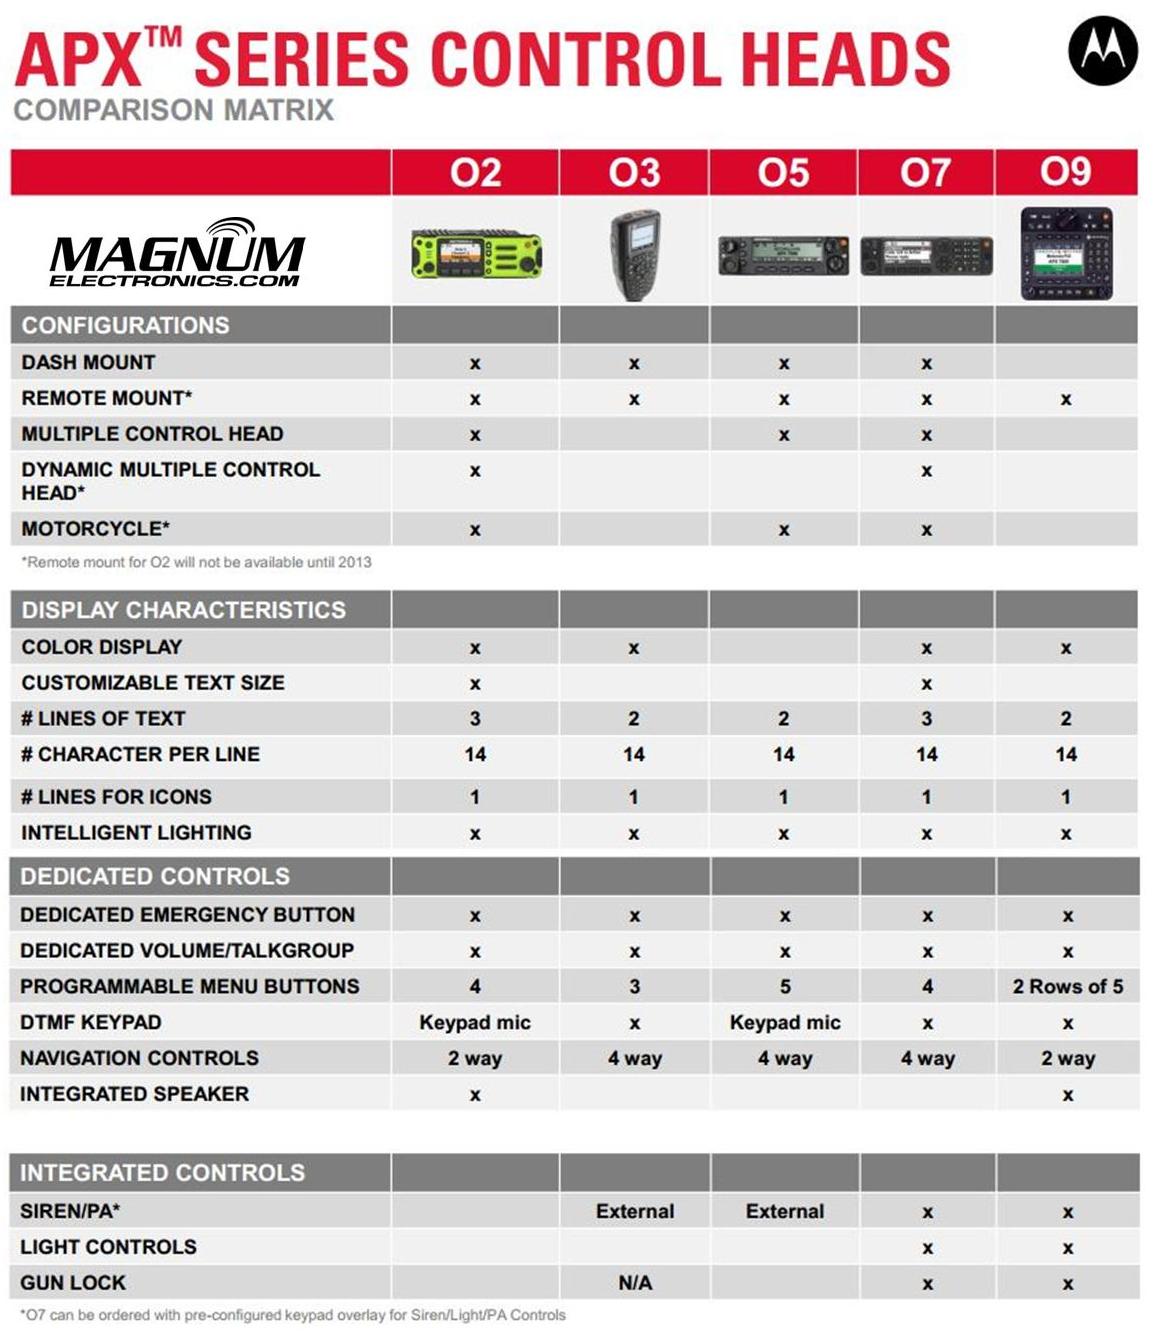
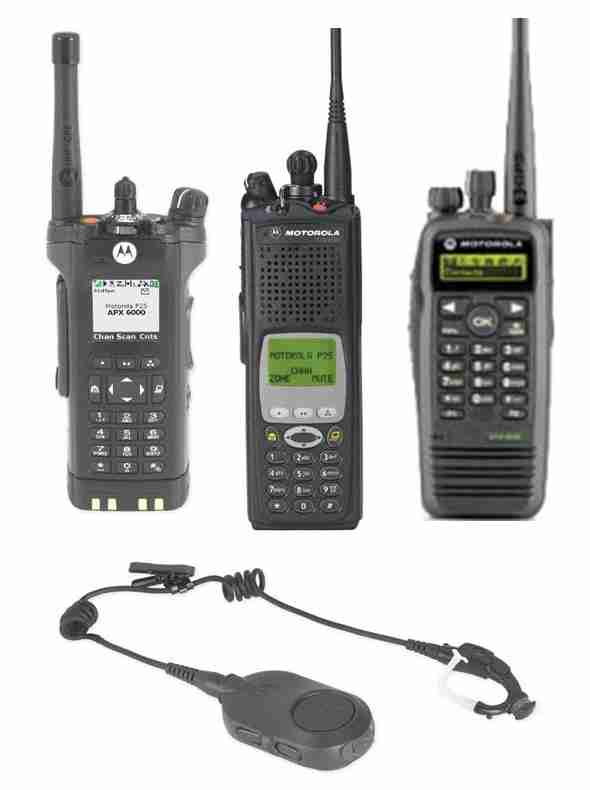
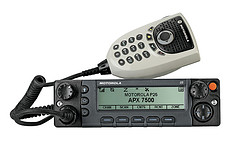
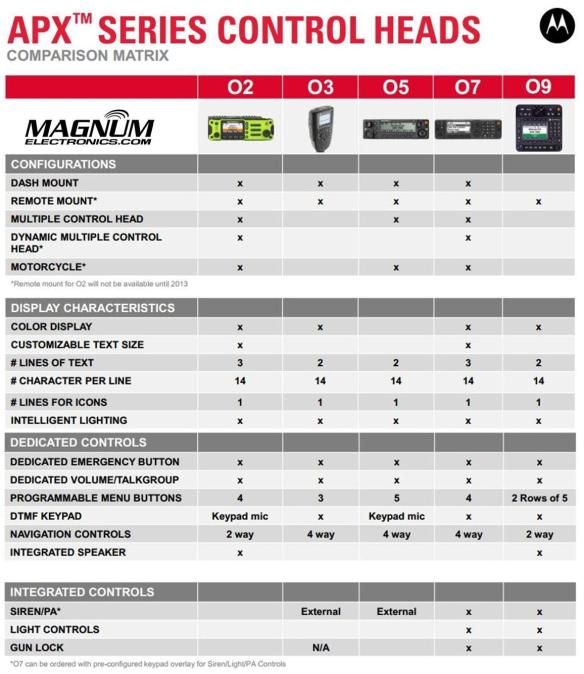
Until last year, only the O3, O5, and O9 heads were available for Motorola APX mission critical P25 mobile radios. The APX 4500 was introduced with the new O2 head for dash or remote mount configurations. There are now five control head choices available for the APX 6500 and APX 7500 radios including the O2, O3, O5, O7, and O9.
The O2 and O7 heads should be considered before you order your next APX 6500 or 7500.
Choose the APX O2 Head Option for Outdoor Installations
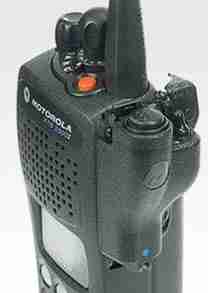
The O2 head is rated IP55 for extreme environments and is designed for motorcycle, marine, and fire truck pump panel installations. We used this configuration for the South Bowers airboat. This rugged, XE style head has a color display, large knobs, and an integrated speaker.
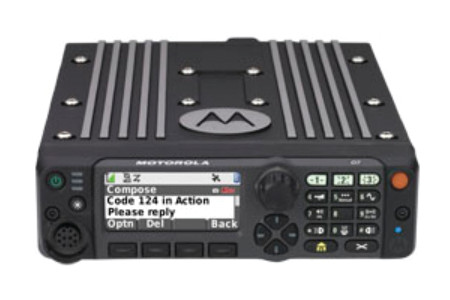
Choose APX O7 Control Head for Integrated Keypad
The O7 control head has a flush-mount design with integrated keypad, siren, lights, public address (PA) and gun-lock controls. It features a color display with enlarged multi-function rotary knob for easier control of talk-group and volume settings.
APX O5 and Specialized O3, O9 Control Heads Are Still Available
The O5 head is still the most popular option for most applications but the new choices make it a tougher decision. The O3 hand-held control head is perfect for covert and other special installations. The O9 head is packed with features but requires a bigger footprint.
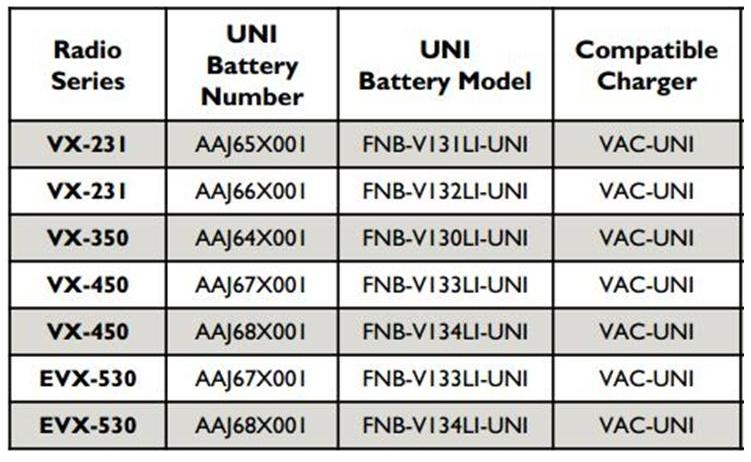
Vertex Standard recently introduced a new UNI energy platform that will eventually provide compatibility for all radio model batteries from a single charger. Older legacy chargers are not compatible with the lower cost UNI style batteries. During the transition you must be careful when choosing replacement batteries.
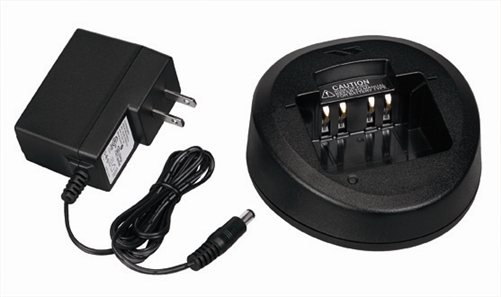
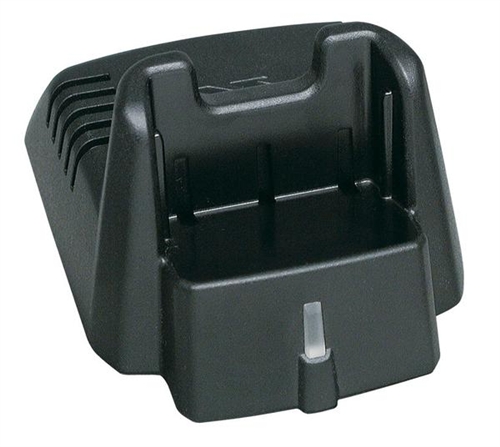
The new XUAAJ72X001 VAC-UNI universal style single unit AC charger has a round pocket unlike the legacy chargers that have square corners. There is a 6 pocket 120V AC charger too. The model number is XUAAK44X001 VAC-6058. Both are compatible with UNI style batteries for the VX-231, VX-350, VX-450, and EVX-530 series so far.
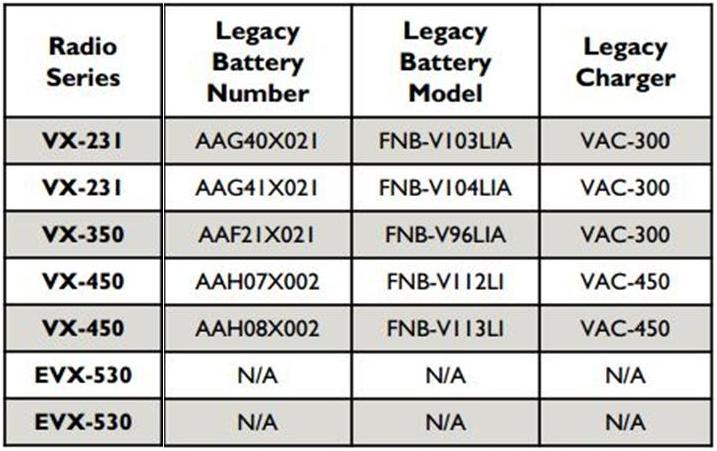
The VAC-300 and VAC-450 legacy chargers have a more square footprint. They are not compatible with the new lower cost UNI batteries. These chargers are included with VX-231, VX-350, and VX-450 series radios. The eVerge EVX-530 series includes the new UNI style.
The chart below shows the legacy batteries and chargers.
More UNI Style Batteries Coming Soon
UNI batteries for the VX-820 Series, VX-920 Series, P25 portables and cancelled models of the VX-410/420 Series and VX-160 series will have UNI solutions available soon. We expect to see legacy chargers cancelled next year.
Bone Conduction vs.Traditional Earmuff Style in High Noise Areas
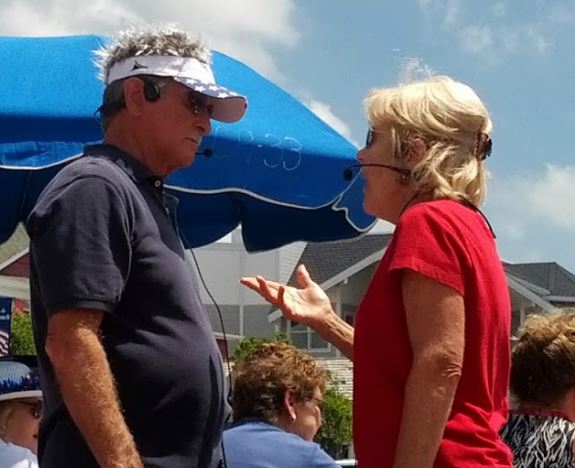
Motorola Solutions offers temple headsets for most two-way radio models and they continue to grow in popularity. Temple transducers use bone conduction technology and are more comfortable in hot weather as compared to traditional earmuff headsets.
Temple transducers keep the ears uncovered making it easier to communicate with the public. The speaker is muted so radio transmissions cannot be monitored and surrounding voices or other sounds can be heard normally. When used in high noise areas, earplugs can be worn for hearing protection.
Comparison Using MOTOTRBO Analog and Digital Radios
Spring & Associates, Inc an HDD (Horizontal Directional Drilling) contractor from Easton, Maryland relies on Motorola MOTOTRBO DMR digital radios on the jobsite.
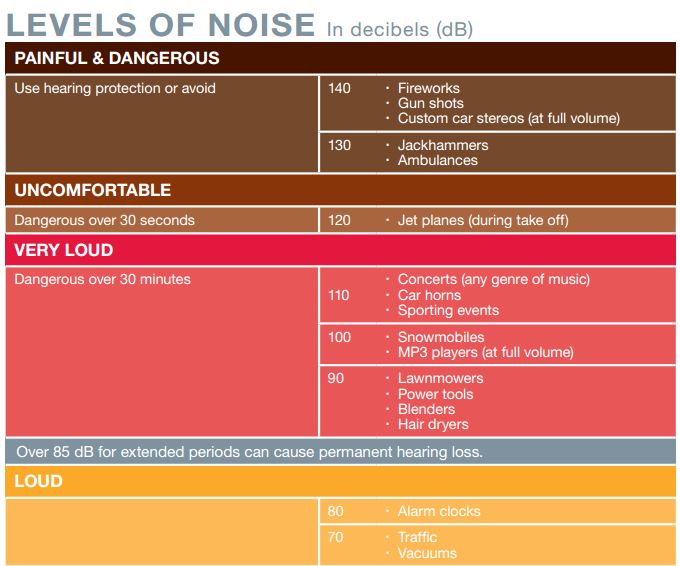
Communications are challenging because noise levels can be 100db and often exceed 130dB close to where the drill operator sits. They compared the Motorola PMLN5275 heavy-duty, dual muff headset and the PMLN5101 temple transducer.
Tests were performed in digital and analog modes using their XPR 6550 UHF two-way radios. Digital mode audio quality was found to be superior to analog. Following are comments by Rodney Spring, President of Spring and Associates:
Muff Style Preferred in Extreme Noise Approaching 130dB
In extreme noise, I’m guessing over 130dB, the earmuff headset was slightly preferred over the temple transducer/hearing protection muffs combo by the operator. It seems that when you idle up the drill to full power/full noise the muff headset has ZERO distortion in the receive mode, while the temple transducer has a little.
Temple Headsets Preferred Below 100dB Noise Level
In noise levels under 100dB the temple transducer was preferred because of comfort and during temporary times of low area noise, being able to remove the auxiliary hearing protection, and still be in touch with other radios while having the ability to hear people around him.
How to Remotely Add or Update a DTR Radio Contact to your Fleet
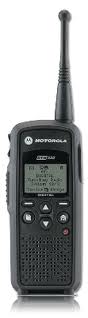
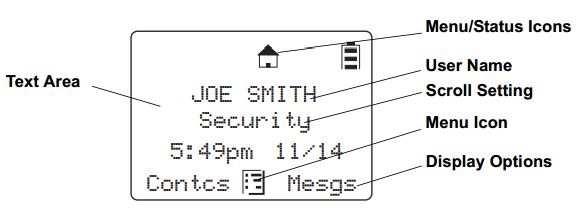
Motorola DTR650 digital radios can be programmed with a unique ID so other users can identify the person transmitting. Most of our customers request that we program their radios with employee names or job functions. This is helpful during emergencies, call alerts, and one-to-one communications.
When an additional radio is purchased, replaced, or updated the digital ID must be programmed in all of the existing radios. This is easily accomplished using the DTR650’s over-the-air programming feature.
All DTR Radios Must Be Turned “ON” and In Range
After the new radio is programmed using Motorola’s DTR CPS software and programming cable, begin by inserting the battery and connecting the antenna. All radios must be powered ON and within range of the new DTR for programming to be successful.
Use Cloning Mode to Add Contacts Wirelessly
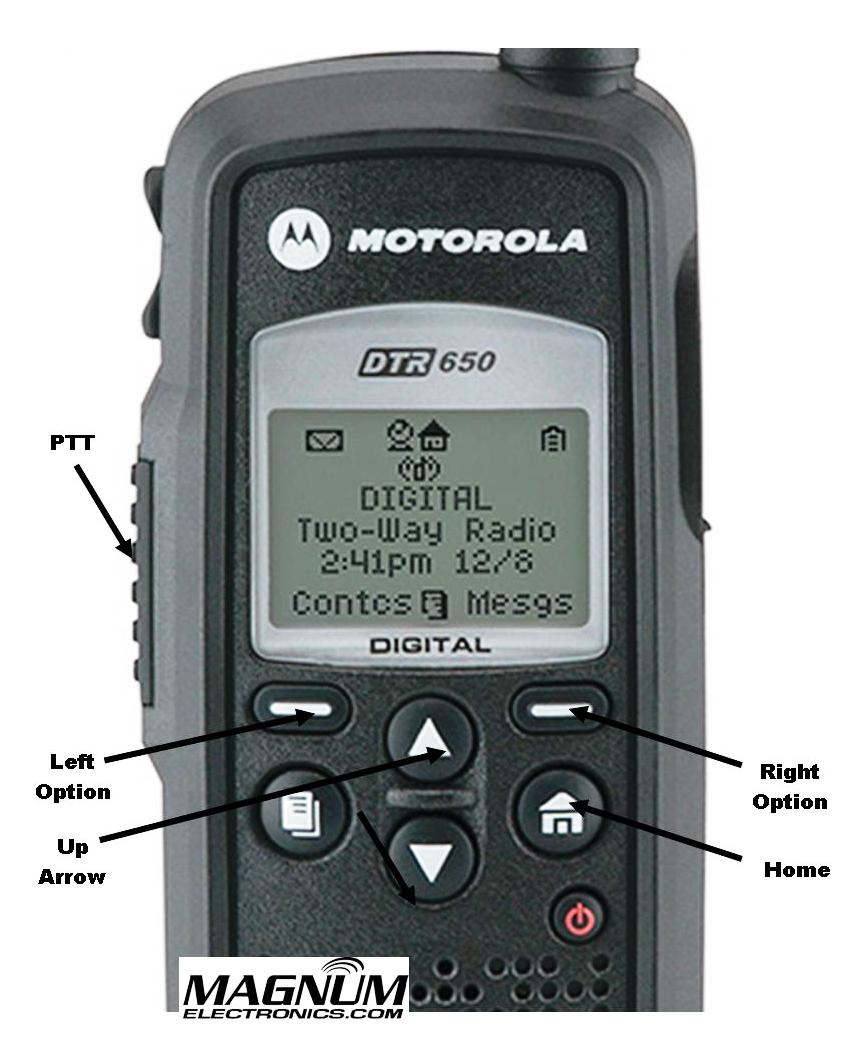
To place the new radio in cloning mode a series of button presses is required. Refer to the picture for button locations and follow the steps below:
Hold down the “Home” button and press the PTT (push-to-talk) button three times
Press the “Left Option” button
Press the “Up Arrow” button
Press the “Right Option” button
Hold down the “Home” button and press the PTT button three times
When done correctly screen will display cloning mode
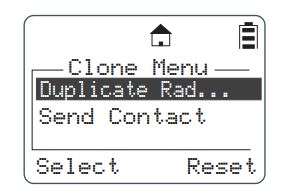
From Cloning Menu Choose “Send Contact”
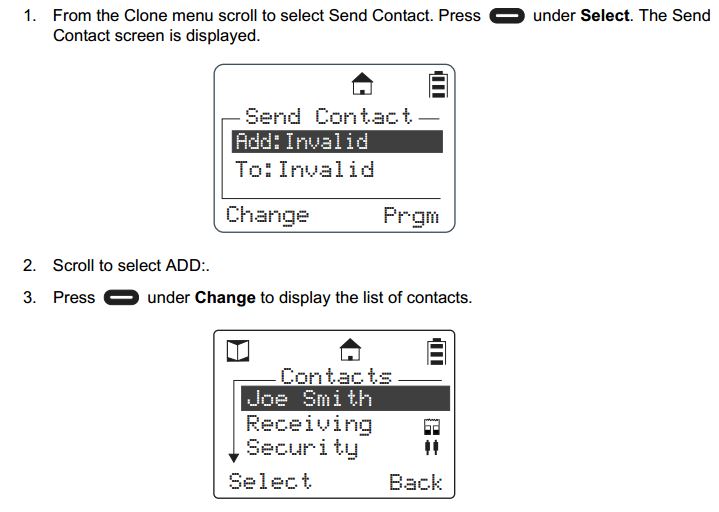
When the DTR is in cloning mode, scroll to the “Send Contact” and choose the contact you want to send to the other radios per steps 1-3 below.
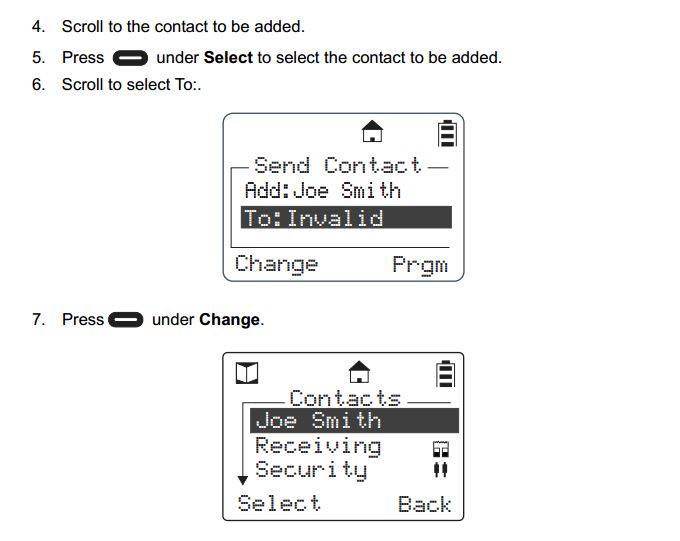
Select the Contact You Want to Send to the Other DTR Radios
Steps 4-7 shows how to scroll through the list of radio contacts and change to the one you want to send to the other radios in your fleet.
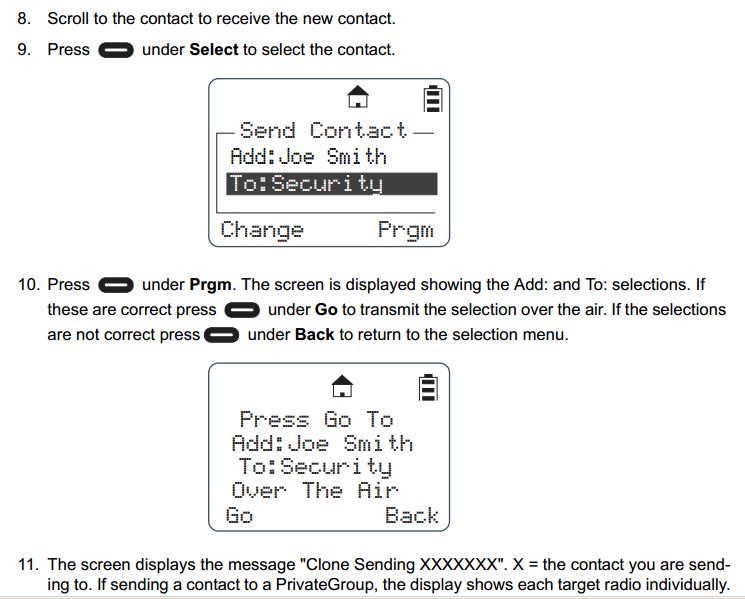
Press “Program” and “Go” to Finish the Cloning Operation
Steps 8-11 include selecting the target radio or radio group and sending the info wirelessly using the “Program” and “Go” soft buttons.
After operation is completed, a status message will appear. It will either display “Successful” or show a list of radios that failed. A radio will fail if it is powered off or is out of range.
If only a single radio needs to be updated, choose the name of the radio that needs to be updated instead of the group. Once this operation is successfully completed and all your radios have been updated with the new radio’s contact information, your DTR system will communicate properly.
Proper IMPRES Battery Care Starts With Initialization
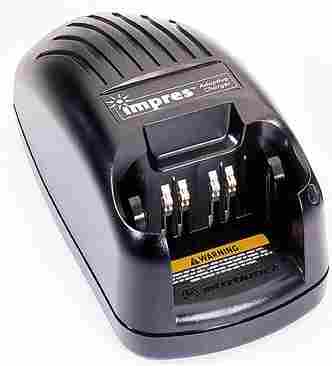
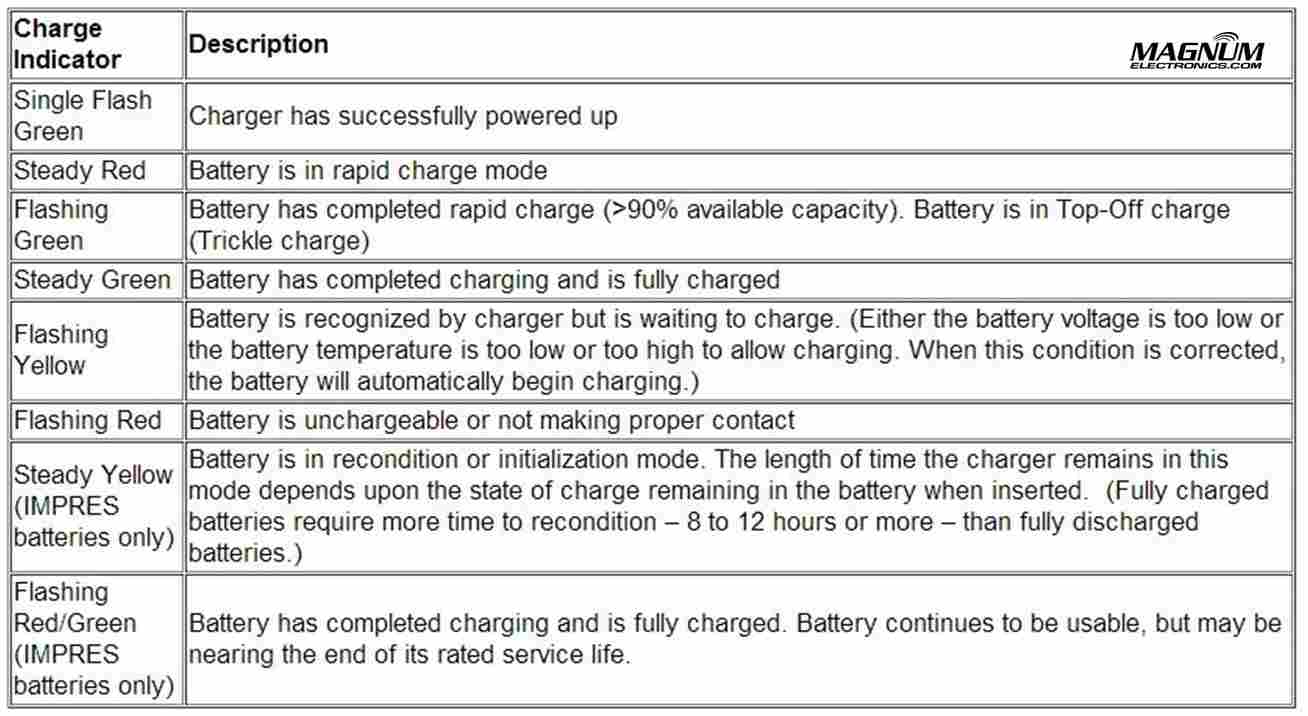
A Motorola IMPRES battery must be initialized by an IMPRES charger the first time it is charged. This process is indicated by a STEADY YELLOW light on the charger indicator (the same as if the battery were reconditioning). The process is automatic, includes an initial reconditioning of the battery, and begins charging upon completion of this process.
This process requires approximately 12 hours depending on the capacity. Do not remove the battery from the charger until the STEADY GREEN light is on.
IMPRES Indicator Light Chart with Explanations
IMPRES Automatic Battery Conditioning
Motorola IMPRES Adaptive Chargers, when used in conjunction with a Motorola IMPRES battery, have the ability to determine the appropriate time to recondition the battery. When an IMPRES battery is properly inserted into the charger, the charger determines if it is appropriate to recondition the battery. If the battery needs reconditioning, the charger automatically indicates a STEADY YELLOW.
This process may take up to 12 hours to complete, depending upon the state of charge and capacity rating of the battery when it is inserted. It is important to note, for this process to be effective, the IMPRES battery must be allowed to complete the recondition/recharge process. Leave the battery in the charger until the charger indicates a STEADY GREEN. At the completion of the recondition cycle, the charger automatically recharges the IMPRES battery.
How to Terminate the IMPRES Conditioning Process
At any time during the reconditioning process of a Motorola IMPRES battery (STEADY YELLOW indication), reconditioning may be terminated by removing and reinserting the battery back into the charger within 5 seconds. This causes the charger to terminate the reconditioning process and begin the charging process. The charger indicator changes to a STEADY RED. The charger will attempt to recondition the battery at the next battery insertion.
Manually Initiating the IMPRES Reconditioning Process
Within 2-1/2 minutes of the initial insertion of an IMPRES battery (STEADY RED indication), remove and reinsert the battery within 5 seconds to manually force reconditioning to occur. The charger indicator changes from a STEADY RED to a STEADY YELLOW. This forces the charger to recondition and automatically recharge the battery. This is a useful feature to have when IMPRES batteries have been in storage for several months or longer. Two or three manual recondition cycles may be required to rejuvenate the batteries, due to long term storage conditions.
Bluetooth accessories are starting to get complicated for Motorola public-safety and professional radio models. There are now three different types of wireless audio accessories:
Mission Critical with encryption and touch pairing
Operations Critical Enhanced with touch pairing
Operations Critical Standard Bluetooth
Mission Critical Wireless With 128-bit Encryption is Most Secure
For the most secure wireless communications that is extremely difficult to hack, choose the mission critical models. These are only available for APX series with the internal Bluetooth option or the XTS series with the external PMLN5792 Mission Critical wireless adapter. Motorola’s proprietary “out of band” pairing with 128-bit encryption provides the best secure connection and only takes a few seconds. Pairing takes place when the radio and the audio accessory are within an inch of each other. It does not matter which radio you use – pairing is easy and quick.
Mission Critical Wireless Accessories for APX and XTS
If you have an APX 7000, APX6000, or APX 4000, the internal Bluetooth option must be enabled. At this time, Mission Critical Wireless is only available for APX radios although it is rumored standard Bluetooth might be available in the future. It is possible to use an external third party or MOTOTRBO adapter but it would not support the encrypted accessories.
The PMLN5792 external adapter is compatible with the XTS 5000, XTS 2500, XTS 1500, MT1500, and PR1500. Cancelled models including XTS3000, HT1000, MTS2000, etc. will probably work but are not supported.
Following are the mission critical accessories for APX and XTS models:
NTN2570 Earpiece with 12 inch cable includes NTN2571 PTT pod
NTN2573 Earpiece with 9.5 inch cable includes NTN2571 PTT pod
Optional wireless earbuds (NNTN8294 11.4 inch cable) or (NNTN8295 45.7 inch cable) are available that attach to the NTN2571 PTT pod. For covert surveillance operations, the NNTN8295 uses ipod type earbuds or any 3.5mm audio accessory.
Enhanced Operations Critical with Touch Pairing
Enhanced Operations Critical provides intrinsically-safe operation with grab-and-go touch pairing. It is only available with the MOTOTRBO XPR 6300, XPR 6350, XPR 6380, XPR 6500, XPR 6550, and XPR 6580 radios. The PMLN5993 external adapter uses the NTN2570 earpiece.
We tried the PMLN5993 adapter with both the APX 4000 and XPR 7550 after getting conflicting answers from Motorola tech support. We tried multiple times with different accessories without success.
Operations Critical Standard Wireless Bluetooth
Standard Bluetooth adapters are available for all XTS, and XPR MOTOTRBO radio models. The RMN5104 allows the XTS 5000, XTS 2500, XTS 1500, MT1500, and PR1500 to use any standard Bluetooth headset. The PMLN5712 adapter is designed for the XPR6100/6300/6500 series. The XPR5350/5550 mobile radio, XPR7350/7550 portable, and the SL7550 have internal Bluetooth included.
Following are the certified Operations Critical accessories:
It is that time again to check your radio batteries so you keep your communications loud and clear. Batteries begin to degrade after 18-24 months of use and can affect radio performance. Many intermittent radio problems are solved with a fresh battery.
How to Read a Motorola Battery Date Code
All Motorola batteries have a 3 digit date code on the battery label. Check the date code on your Motorola battery and if the first digit is a “0” or “9” it is a good time to replace it.
The first digit represents the “Year” and the next digits are the “Week” manufactured. For example; 036 is the 36th week of 2010.
All Motorola batteries carry a replacement warranty of at least a year after the date code and probably longer if marked IMPRES or contain NiCD cells.
Replacement Batteries for Motorola, Vertex, & Other Radio Manufacturers
We carry Motorola Original OEM, Vertex-Standard OEM, and Power Products batteries for all current and discontinued radio models.
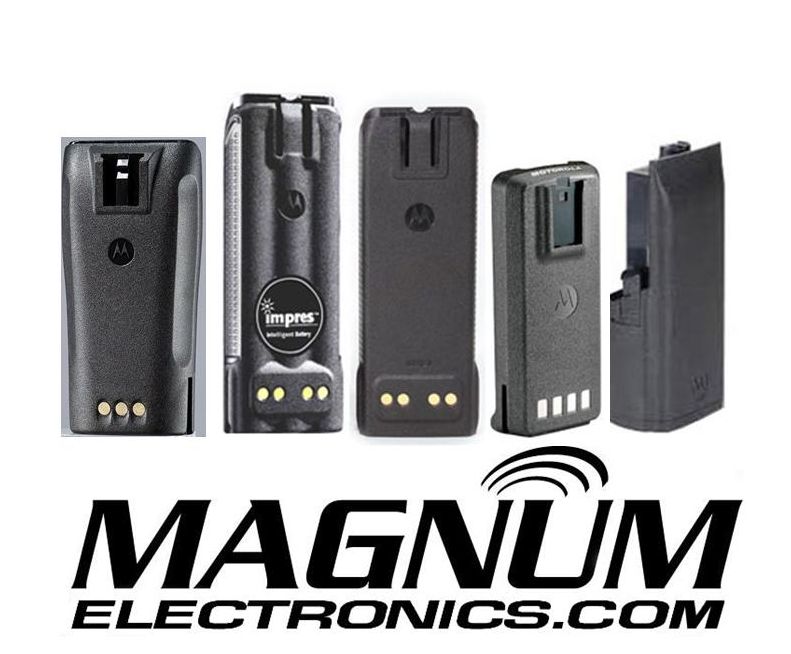
Below are links to the most popular and recommended batteries:
We also carry replacement batteries for Harris, Kenwood, Icom, Tait, and many other hard to find models. Check our 2-Way Battery selection or call us and we will be happy to help you find the best battery for your needs.
What is different between Li-ion and Li-Polymer Batteries?
We have received several inquiries about the newest battery technology, Li-Po, that is now available for 2-way radios. Historically, NiMH was an improvement as compared to NiCD and Li-ion has many advantages over NiMH. The assumption that Li-Po is now the best battery for your radio is more marketing than anything else.
Li-Po or Lithium Polymer battery cells still use the same chemical material as Li-ion but the difference is the way they are packaged. Li-ion batteries use a thick-walled, rigid aluminum case for the cells and Li-Po utilizes a new thinner foil aluminum case. Bottom line is the difference is all in the cell construction.
Both Li-ion and Li-Po are Recommended But Check the Specs
Li-Po battery manufactures must add a more rugged case to meet the mission-critical specs required for two-way radio specifications. When comparing Li-ion and Li-Po batteries the following should be considered:
Battery capacity measured in mAh – The higher the mAh number the longer your battery will work before needing a recharge. When comparing specs be careful when you see the words “typical” or “average” and not “minimum” or “rated”. Our experience is there can be a big difference in actual results.
IMPRES or Advanced Charging Technology – “Smart battery” automatic conditioning improves performance and keeps them in service longer.
Drop Specification – Dropping the radio is probably the most common reason why batteries fail. Most Motorola mission-critical batteries are rated at 36 drops from 5 feet to a concrete floor.
IP (Ingress Protection) Rating – Higher IP numbers are better and signify the ruggedness of the battery. The first number references solids and the second number signifies liquid protection. The highest solid number is “6” (dust tight) and the highest liquid is “8” (submersibility beyond 1 meter).
Overvoltage protection circuit – Better batteries have 2 levels, some have 1, and lower cost batteries may not include have protection at all.
Temperature Range – Extreme cold affects Lithium battery performance and the spec should be investigated if your environment is outside “normal”.
Intrinsically-Safe Rating – FM Approval is important if you use your radio in hazardous, combustible atmospheres where an electrical spark could cause an explosion.
 Choose the APX O2 Head Option for Outdoor Installations